


These production tips and tricks are designed to help you make the most of your music. Covering everything from mic technique to post-production, we hope you find them useful!


© Tenth Egg Productions 2009


Audio Editing is a fundamental skill for any engineer / producer to master and today's software editors provide us with some powerful tools for totally reshaping our material post-recording. Although we should be careful to avoid the 'fix it in the mix' mentality, understanding what can and can't be achieved at the editing stage can really help get the most out of recording session. Knowing that you can fix a problem later, rather than slavishly re-recording again and again in pursuit of perfection, can avoid wasting valuable session time and denting your performer's confidence. In this tip we'll cover the principal applications for editing and how to approach them.
Most audio sequencers present two approaches to editing audio; what I'm going to call 'Overview' editing and 'Sample' editing. All tasks will use one or other of these or even a combination of both
Overview Editing is carried out the in the main 'Arrange' or 'Project' window and is the best place to do the heavily lifting work such cut-copy-pasting whole regions, trimming start/end times and splicing parts together. The main tools used the scissors (to chop an audio region in two), the eraser (removes audio regions) the trimmer (to alter the start-end time of the region) and the fade tool (for fade-in/outs and cross-fades) - more of all of these later. The best part about everything you do here is that it's what's called 'non-destructive editing' i.e. it is totally reversible. This because you aren't changing the waveform itself.
Tip 20 : Digital Audio Editing - Part 1


music mastering

Tips and tricks from our engineers to help you with your music making


Industry news, useful links and what’s going on at Tenth Egg


Share us with your friends

A different approach to music production.


Share us with your friends
So if you chop a waveform in half, delete the bit you don't want and then stick a fadeout on what's left, the original waveform is always there to go back to (either by dragging a fresh copy out of the audio pool or by pulling back out the start and end of the region.
The Overview is also the place to carry out any editing across multiple audio regions, especially if you've recorded an element with multiple mics.
The Sample Editor is usually accessed by double clicking on a particular waveform and will pop up a new window containing just that single piece of audio. From here we can zoom right down to the individual sample level to make alterations. The basic cut-copy-paste and fade tools are present, but in addition we can also make volume, pitch and speed adjustments and even apply effects plug-ins. Unlike Overview editing Sample editing is destructive as you are changing the waveform itself and how far back you can go will be limited by the number of undos in your sequencer or when you made your last backup
So let's look at some of the most common editing tasks. . .
Comping:
Comping refers to editing together a single 'best' performance from multiple takes and is usually performed in Overview editing mode. The first step is to create an empty track above or below your recording tracks and use this as the place to assemble the master take.
Then audition each take and remove any bits that you defiantly won't use by cutting round them with the scissor tool and deleting (as we're working in Overview mode, they aren't gone forever). Using the same method you can also splice each take into sections and perhaps colour them green and yellow depending on whether they should definitely be used or are just a maybe. At this point you can afford to be quite rough with your editing and concentrate more on the performance aspect. Make your decisions and drag the best parts into your master take track.
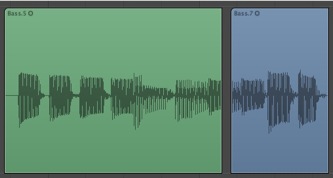
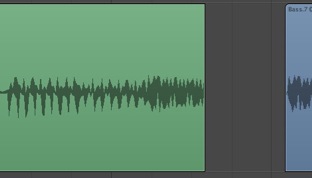
If there are lots of handy gaps in the song then 'comping' together this perfect take can be pretty straightforward and all that will be needed is a bit of cleaning up (as described below). However, if the takes you are trying to edit together play more or less continuous through the track then the edits may need some extra attention to work smoothly. Take the example of two bass phrases that we wish to edit together and need to run smoothing into one-another.
Then we trim back the end of the previous phrase to the very end of the last note we want to keep.
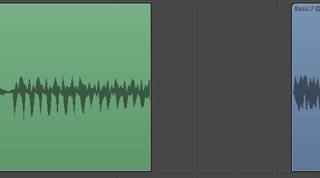
Edits are best placed just before a note as the hit helps mask the transition, so we zoom in and trim the start of second phrase right up to before the first note.
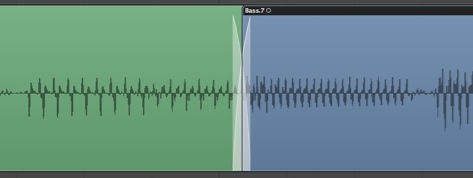
Finally we bring the two parts together and use a quick cross-fade to smooth the two overlapping parts together.
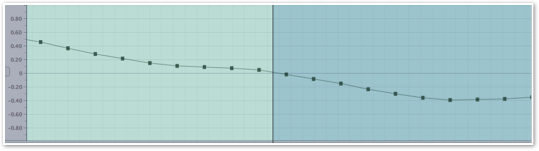
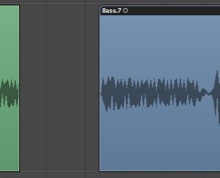
For the time-stretch option we may need to enter the sample editor. After double clicking on the audio region we need to drag and highlight the note to be extended (remembering to select from the very beginning of the note. Select the time-stetche tool from the menu (in Logic this in under Factory > Time and Pitch Machine). Most time stretchers have a fairly standard set of controls allowing you to change length independent of pitch (which is what we want) or with pitch. Then you can usually dial in a stretch by BPM or time in Seconds/Milliseconds. We want to stretch our note our just enough so that it overlaps the start of our second audio region. With the stretch applied we can return to overview mode and apply a short cross-fade.
Cleaning up:
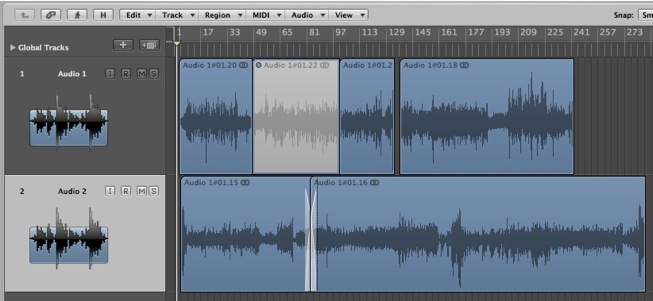
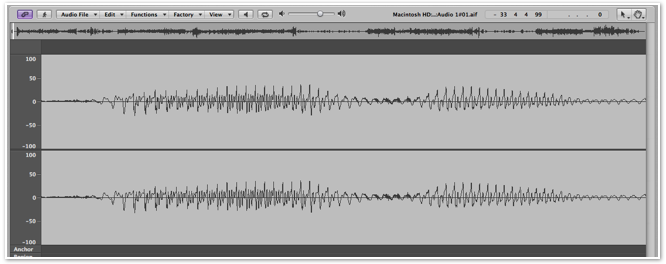
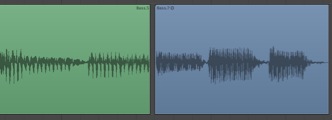
It's not unusual to record a bit of silence before and after each take or even end up with chunks of empty audio within a take between song sections, as pictured below.
Even if you're recording in a relatively quiet environment, there will always be some background noise and more than likely than not some other unintentional sounds - think vocalists rustling their lyrics of drummers squeaking their stools - that you'd like to cut out. By cutting up and trimming down your regions to just the good bits you'll end up with a much cleaner and transparent sounding recording where the details in your audio aren't masked by a collection of background noise.
Most cleaning up can be performed in an Overview mode using the scissors to roughly cut up the audio regions and the eraser to remove the unwanted portions. The next step is to zoom in and use the trim tool to drag in the beginning and end of each audio region to as close to the start and end of the good audio as is practical. Some edits might benefit from a quick fade in/out to make them less apparent if there is a lot of background noise (e.g. a buzzy guitar amp), anywhere between 50-1000ms should do the job. This transforms the waveform we looked at above to what we see below, and remember you can make all these edits with confidence because you can always drag out the start/end of the audio region to return it to it's original form.
With the basic cleaning up done we can now concentrate on the details, such as removing noises between phrases and tightening up performance aspects. This kind of fiddly work is best done in the sample editor. Remember that unlike Overview mode, the changes here are only reversible as far as your undos go so it makes sense to create a backup of your audio before your start and most editors will provide a simple Create Backup / Revert to Backup option under the file menu.
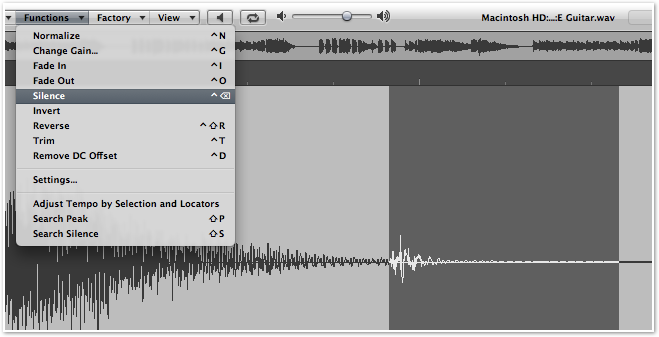
You can use the 'Silence' function to remove any remaining noises and a combination of silencing and a fadeout to shorten any overly long notes. When performing this kind of fade a non-linear (or 'curved') fade will often sound more natural, starts slowly and then fading rapidly. With every edit you do it's a good idea to check that it works in the context of your track and be careful not to go over the top - removing every breath sound from a vocal performance might seem technically better but might not sound right in practice.
Zero Crossing Points:
To get nice clean edits that don't click or pop it's important to edit on what's called a zero-crossing point. This is where the waveform crosses the centre axis and the audio's amplitude is zero. By positioning your edits at these points you ensure that when you place two audio regions together their amplitudes will match and avoid any sudden jumps in level between samples (which is essentially what an audio glitch is). Most editor will give you the option to automatically select these.
A zero crossing point may be harder to find with stereo material, as there are now two separate waveforms moving independently, but you can usually get away with one channel being slightly off if you use a quick cross-fade to smooth the transition.
In part two we'll continue by look correcting timing and pitch, adjusting tempo and some advanced techniques such as finger-print click/pop and noise removal.


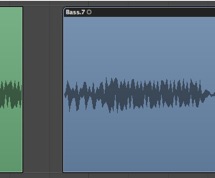


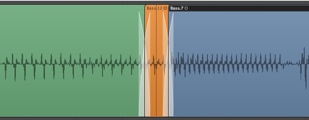
This works well in cases where the preceding phrase has enough sustain to overlap the following audio region, but what if the phrase before was played too quickly and the last note ends short? Maybe for our bass example a short gap would work fine, but in other instances this gap will sound out of place. What we need to do is extend that last note and there are two ways to do this, by time-stretching out the preceding phrase or by copying in a short filler section.
The filler section option can be performed in Overview mode, and all we do is make a copy of the note we can to extend and trim it down to a short section, just longer than the gap that needs filling. Then we place it so that it overlaps both the end of phrase one and the start of phrase two and use short cross-fades to smooth the transitions.


In addition to the built in sample editor most sequencers will give you the option to integrate a third party solution should you prefer. Dedicated audio editors such as Soundtrack Pro on the Mac and Adobe's Audition (formerly Cool Edit Pro) on the PC offer the kind of comprehensive feature sets that make them better for more challenging tasks, such as fingerprint noise removal.


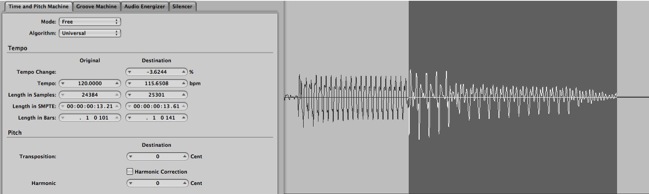

Above: selecting the last note and using the ‘Time and Pitch Machine’ to time-stretch it