


These production tips and tricks are designed to help you make the most of your music. Covering everything from mic technique to post-production, we hope you find them useful.
If there’s a topic you’d particularly like to see covered then please feel free to get in touch


Industry news, useful links and what’s going on at Tenth Egg
© Tenth Egg Productions 2007


A different approach to music production.

music mastering

Tips and tricks from our engineers to help you with your music making


Compression is one of the most useful tools in any engineer's armory, without which tracks can sound thin and unbalanced. However, used incorrectly and it can also destroy your tracks making them sound flat and uninteresting. If you're new to compression then the best approach is to use caution until you get used to the controls and the 'sound' of compression. This is particularly the case for instruments with a lot of attack like acoustic guitars as compression can unnaturally flatten these, taking the life out of the sound.
In previous tips I've talked about how to use traditional downward compression to make vocals sit right in a mix and I suggested that you could try compressing in stages using one compressor to as transparently as possible control the peaks and a second to gently lift low end detail whilst allowing the already compressed peaks through. This technique can work well for instruments too, but there is also another, less common approach which can be even more effective and allow greater compression without negative audible side-effects.
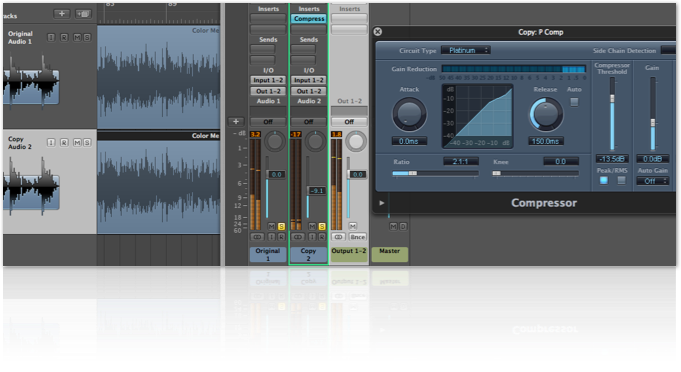
Parallel compression, involves mixing in a compressed copy of an instrument with the original, the idea being that the transient peaks of the original are retained but the low level detail is brought up to give a thicker sound. When the level drops below the threshold on the compressed channel, this copy will be adding to the original and boosting the overall level. Then when there is a peak and the compressor kicks in the signal is compressed and adds less to the overall level. Mixed in at the right level this compressed copy can create extra thickness, without adding significantly to the peak level of the instrument.
There are some technical requirements to make this work. The compressor on the copy must not introduce any time delay or the signal will be out of phase with the original. If you're trying this in something like Cubase or Logic make sure that plug-in delay compensation is switched on. The other requirement is that the compressor is peak sensing and can have a 0ms attack time. Without this peaks will pass through on the copy and add to the peak level.
In practice, make a copy of the instrument's audio file on a fresh track and apply a compressor plugin to this copy. Set the attack time to 0ms and the release to around 250ms+ A ratio of 2:1 works well and you should be aiming for around 4-5dB gain reduction on the peaks (automatic gain make-up should be off). Now play the two tracks together and slowly fade up the compressed copy to find a level which works well (usually somewhere between -15dB to -5dB). Hopefully the effect is that the combined peak level has barley risen, but the instrument sounds fuller and has retained its original attack.
Here’s what that could look like in Logic . . .
Tip 8 : Parallel Compression